Thursday, July 31, 2008

Level Failure

There are only 2 ways that you can fail a level in the Magic Toy Chest:

1. By exceeding the level's time limit
2. By losing enough of the goal toys, making it impossible to reach your goal.

When the Level Failure prompt appears, press the 'R' Key to Restart the level.

In many cases, a Player will make mistakes and potentially get their goal toys stuck or use their available tools in an incorrect manner. Unfortunately, the game cannot detect this as Level Failure. If you get stuck for too long, make a mistake, etc. remember that you can press 'R' at any time to restart the Level.

Wednesday, July 30, 2008

Opening the Toy Chest

Before you can put away any of your toys, the Magic Toy Chest must be opened. Find and click on all the toy chest keys. When there are no more keys, click on the toy chest to open it. If you have missed a key, clicking on the toy chest will do nothing.

The top of the toy chest can be manipulated by physics, so be wary that the Gravity Robot, Balloons, and or the Dart Gun can remove the toy chest lid. In many cases, this lid can interfere with the chore at hand.

Level Objective

The Goal of each level is to put away a specified amount of a certain toy within the Level's time limit. This goal toy is displayed in the upper right corner. The level is completed when the adequate number of goal toys have been returned to the toy chest. When the goal toys fall into the chest, they will automatically disappear and the goal amount will decrease. When this goal amount reaches Zero, the Chore is complete!

Tuesday, July 29, 2008

Saving, Loading & Testing

Load Button - Opens a browser window to find and load your level file

Save Button - Saves your current level

Save As Button - Opens a browser window where you can select where to save and what to name your level file.

Test Button - click to save your level and load it/play it in another window. Test your level and close the window when you are finished to return to the level editor

New Button - erases, clears and resets the level

Exit Button - Returns you to the Title Page

Monday, July 28, 2008

Level Properties

(click the above image to see full screen)
The Level Properties are almost all located at the bottom of the Editor Menu. Each Level for the Magic Toy Chest has a Title, Description, Time Lmit, Goal Toy, Goal Amount, Par Time, and Par Action.
Setting the Goal - You can adjust the level's goal toy and the goal amount by clicking the +/- buttons at the top of the right menu. It is important to include an adequate number of the goal toy so that the Level can be completed.
Level Title- Simply click in the space and type in your Level Title
Level Description - click and type in this area to describe your level, give a hint, or include an author credit.
Setting Level Time Limit - left click and hold on either the +/- Buttons to increase and decrease the Level Time Limit. You can right click to incrementally increase/decrease.

Setting the Par Time - left click and hold on either the +/- Buttons to increase and decrease the Level Par Time. You can right click to incrementally increase/decrease.
Setting the Par Actions- Left click on either the +/- Buttons to increase and decrease the Level Par Time. You can right click and hold to drastically increase/decrease the level's actions.

Friday, July 25, 2008

Level Editing

(click on image above for full screen)
Selecting your Toy/Tool - Your cursor will display the current toy/tool that you have selected. You can left click on any of the tools in the Editor Menu to instantly select them. You can also use the up/down arrow keys to change your current tool.
Placing Background Tiles - First select a background tile (the black tiles above the toy chest). Next use the +/- buttons in the right bar to set the tile's texture. Left click on the grid to place your selected tile. You can left click a tile to change the texture. Right clicking a tile will remove it. You can press and hold the Left Mouse Button to draw tiles across the grid.
Placing Toys/Toy Chest/Keys - Select a Toy from the Editor Menu and left click to place it in the level exactly where your cursor is displayed. You can change many toys directions by double clicking with the left mouse button on them. To remove a toy, right click on the toy or use the eraser.
Erasing - Pressing and holding the right mouse button for a few seconds will change your cursor into an eraser. Touching any object with the eraser will remove it from the field. Releasing the right mouse button will return your cursor to your last used toy/tool.
Closing/Opening/Moving the Editor Menu- If the Editor menu is in your way, you can click and drag the window or close it by clicking the x or the close button. To open the Editor menu press Spacebar. It is often helpful to select your tool, close the menu, edit your level and then reopen the menu when you need to change tools or edit lvl properties.
Changing the Backdrop - Left/Right click the Change Backdrop button to cycle through the available rooms/backgrounds for your level.
Changing the Music - Left/Right click the Change Music button to cycle through the available music for your level.

Level Editor Controls

Left Mouse Click -

  • Select Toy/Tool from Editor Menu
  • Place selected Toy/Tile in Level
  • On a Background Tile to change Texture
  • Double Click on a Toy to Rotate it
  • On Toy Inventory Buttons to increase starting toy amounts
  • On Change Backdrop/Music to advance selection
  • On +/- buttons to advance/decrease amounts
  • On Load/Save/Test/Etc Buttons to Activate Button
Right Mouse Click -
  • Remove Toy from Level
  • Click & Hold to access Eraser to remove objects from level
  • On Toy Inventory Buttons to decrease starting toy amounts
  • On Change Backdrop/Music to decrease selection

Mouse Wheel- up/down increases/decreases traincars when placing toy trains

Up/Down Arrow - advance/decrease tool selection

Spacebar - Open Editor Menu (if closed)

'T' Key - Advance/Change all tile textures

Thursday, July 24, 2008

Gameplay Expained: Menus/Toy Toolbox etc.

(click on the above picture to view full screen)
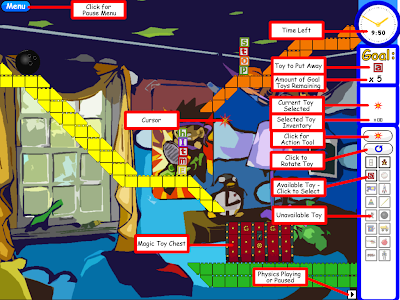
The image above briefly explains many of the menu and game objects in The Magic Toy Chest.
Menu Button (top left corner) - Click this button (or press ESC) to access the Pause Menu
Explanations of Menu Bar (right hand side)from Top to Bottom:
Time Left - This counter displays how much time left you have before you exceed the level's time limit and fail the level.
Goal Toy - This displays the goal toy that you need to get into the Toy Chest
Goal Toy Remaining- the number below indicates how many more of the goal toys you need to get to the Magic Toy Chest to complete the level
Current Toy Selected - This displays the current toy/tool that you have selected. your cursor will also change to the toy you have selected.
Selected Toy Inventory - This number reflects how many of the selected toy you have remaining to use. If the action tool is selected, this number reflects the number of actions you have taken in the level so far.
Action Tool Button - click this button to select the action tool
Rotate Toy Button - click this button to rotate the selected toy
Available Toy Button - if you have a certain toy in your inventory the button will become active. Click an available toy's button to select that toy.
Unavailable Toy Button - if you have no inventory of a certain toy, that toy's button will become inactive and unavailable.
Physics Pause/Play Indicator - this indicator shows you whether or not you have the game's physics playing or not. You can Toggle the world's physics to play/pause by pressing spacebar or clicking the middle mouse button. This indicator displays the current state.

Wednesday, July 23, 2008

Level Completed!

After putting away all of the specified toys, the "Chore Completed" Menu (pictured below) will open and inform you about your level statistics.

You can earn 1-3 stars. You will get 1 star for successfully beating the level and you can earn additional stars for beating the level's par time and/or staying below the maximum allotted actions.The Menu above displays the current Level's Par Time, Your Time, Par Actions, Your Actions, and Extra Toys. If you successfully perform under the level's par time and max par actions, you will earn an additional star that will be displayed next to your stat. If your actions and/or par time are better than your previous time/actions, you will set a new record. Only your best times and actions are saved in your profile.

When you are ready, you can click either the "Restart" or "Next" Buttons. The "Restart" button will reload the level so you can easily go for those 3 stars and that 100% completion rating. The "Next" Button will load the next level or tutorial. If you are playing the final level of a room, the Next button will return you to the level select screen.

Tuesday, July 22, 2008

Playing the Main Puzzles: Selecting a House Region & a Chore

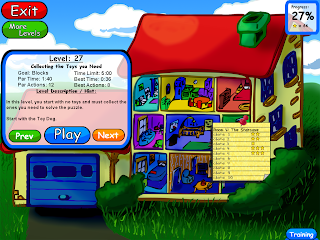
In many cases, you can simply use the "Next" and "Prev" Buttons to select the level/chore you would like to play. These buttons increase and decrease the selected level. However, in many cases you will want to select a specific room and chore in the house. The first step is to left click on an unlocked room of the house (locked rooms are blacked out).

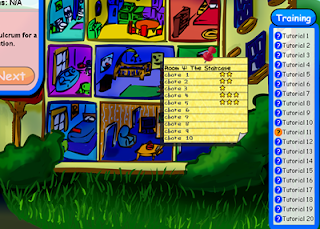
Clicking on a room will tack up your mother's chore list (as pictured below)
This note will identify the room and will list the 10 chores (or levels). The stars indicate the chores completion. 1 star indicates that you beat the level, 2 stars indicate that you beat the level and were either beat par time or were under the par actions, 3 stars indicate that you have beaten the level 100% and have beaten the par time and par actions.
To select a specific chore, click the "chore #" text or line on the notepad.

The selected level's title, level number, goal toy, par time, time limit, level hint, etc. will be displayed in the window to the left of the house (displayed above). If you have already played the level, it will display your best time and lowest total actions.

You can adjust the selected level by clicking the next/prev buttons. When you are ready to play the level. Click the "Play Button"

Monday, July 21, 2008

How to Play User Created or Downloaded Levels

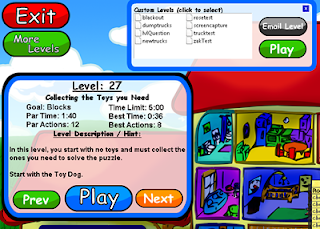
Click the "More Levels" Button to open the user created level browser. This will open the custom level menu seen in the screenshot above. This menu will list all of the level files that you have created or downloaded (must be in the \Levels\ folder). To play a downloaded or user-created level, simply left click on the desired filename. The level information will be displayed in the level information menu on the left hand side of the screen. With a level selected left click the "Play" button to load and enjoy the level.

If you would like to submit your created level to this website. Select the filename and then click the email level button. This will submit your created level to us for posting on this site.

You can click the x box at the top of the custom levels menu to close the menu at any time.

Friday, July 18, 2008

The Load Screen

The Load Screen reiterates the level title, par time, par actions, hints, etc. while the game loads the level. You can opt to click the "map" button to return to the Level Select Screen or click the "skip" button to move onto the next chore. When the level is loaded, the Play button will be enabled and the text will read "Load Done" at the bottom. Click the "Play" Button to begin the level.

Thursday, July 17, 2008

Playing the Tutorial Training Levels

If it is your first time playing, it is highly recommended that you take some time to play the tutorials.

You can open the Tutorial Select Screen by clicking the "Training" button in the bottom-right corner of the Level Select Screen. This will open the select screen pictured above.

Select a Tutorial by left clicking the corresponding question mark button. This will load the level information into the level description box (on the left hand side of the screen). Feel free to read about each tutorial. When you are ready and have the correct training level selected, click the "Play" button. Double-clicking a question mark will select and load that tutorial level.

The Level Select Screen

The Level Select Screen or House Map is the main hub where you select which level you want to play. You can click the EXIT button in the top left to return to the title screen at any time. Please click one of the following topics to learn more:

PLAY TRAINING LEVELS
PLAY MAIN PUZZLES/CHORES
PLAY USER-CREATED LEVELS

Wednesday, July 16, 2008

The Options Menu

The Options Menu can be accessed during Gameplay to change your current play settings. Use the drop down menus to change the music that is playing, change the background/room, change the background filter, or change your language.

When you are finished adjusting these options, click the OK button to go back to the gameplay.

Tuesday, July 15, 2008

The Pause Menu

Pressing ESC or clicking the 'Menu' Button during a level will open the Pause Menu.

Options - click this to bring up the Options Menu
Map - click this button to return to the map/level select screen
Website - click this to visit the Graduate Games website
Restart - reloads the current puzzle
Skip - skips the current puzzle
Play - resumes the game/level
Exit - exits to the title screen

Toy: Water Balloon

Water Balloons are the Magic Toy Chest's Grenades. With the Water Balloon Toy selected, simply aim and click where you want to throw a water balloon. The balloon will burst open and send any toys or objects in the splash zone flying.

Monday, July 14, 2008

Toy: Gravity Robot

The Gravity Robot is one of the wackiest toys in the game. You can place the robot in any direction. Clicking on a Robot will activate its crazy sci-fi gravity powers. Gravity will change in the direction of the Robot's arms and arrow on its chest. Clicking a robot again will put its arms down and restore gravity to normal.


Monday, July 7, 2008

Toy Chest Beta 2 is Available for Download!

Graduate Games is happy to announce that you can download our second (and probably final) beta starting today (7/7/08-7/14/08). The game has changed quite a bit since the last beta and hopefully everyone who has played the game before will notice the improvements.

You can download the Beta here.

What has changed since last time? Well there's now 20 Tutorial Levels that will teach you how to play and how all 16 toys work. There's also background filters for everyone that found the backgrounds too "loud." There's also a number of tweaks that make the easier tonavigate, etc and nicer on the eyes. Thank you to everyone who submitted feedback and helped us make these changes. Keep the changes and levels coming and you'll receive $5 off the final game...just make sure we have your email address.

Remember to sign-up for our newsletter so you'll know when the game is released.

Watch the Game in Action

Sunday, July 6, 2008

Toy: Train

The toy train is a dynamic toy that can be lengthened to create long lines of traincars. You can also pick up individual traincars and break apart the long chain of traincars.

With the Train Tool selected, moving the mouse wheel up will add train cars and moving the wheel down will subtract cars. Left clicking will place your entire train into the playfield.

Thursday, July 3, 2008

The Rooms of the House


Wednesday, July 2, 2008

Toy: Helicopter

The Helicopter is a very sophisticated Toy and is great for transporting other toys to higher heights. Clicking it with the action tool will cause it to hover skywards and then travel forwards in the direction it is facing. You can also attach any toy to the helicopter by Left Clicking the copter (with any tool selected other than the action tool) holding the left button and dragging it over another toy in the playfield and releasing the left button.... so left click on the copter and drag to another toy.

Tuesday, July 1, 2008

The Nursery